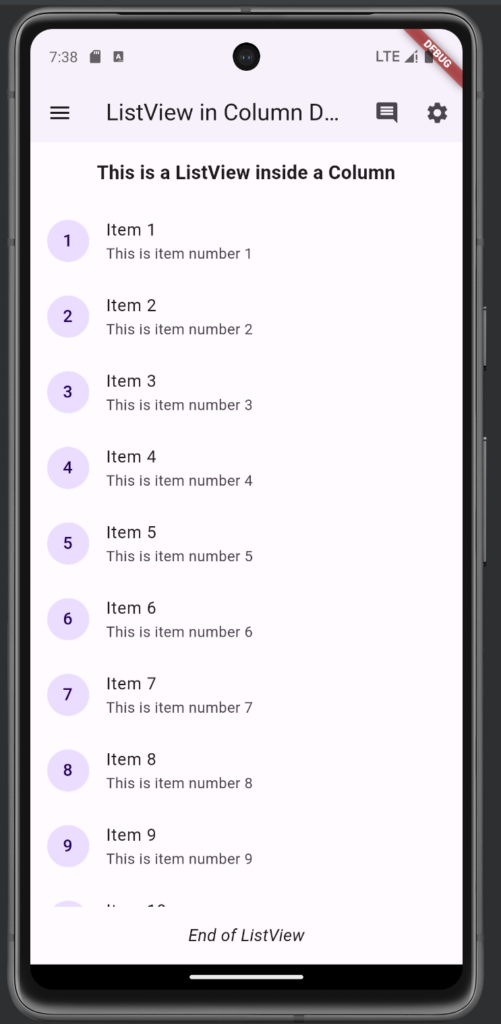
Hey there, Flutter enthusiasts! Today, we’re going to chat about how to stuff a ListView inside a Column. Sounds simple, right? Well, there are a few tricks to it!
Imagine you’re building this super cool app, and you need to show a bunch of scrollable content on a page, but you don’t want the list to hog the entire screen. That’s where the “ListView in Column” trick comes in handy!

Let’s break it down step by step:
- Start with a Scaffold
Think of this as putting a nice, fitted jacket on your page. It comes with a built-in AppBar and a big body area just waiting for your creative touch. Here’s what the code looks like:
   Scaffold(
     appBar: AppBar(
       title: const Text("ListView in Column Demo"),
     ),
     body: // This is where the magic happens!
   )
- Wrap it in a SafeArea
SafeArea is like a cozy sweater for your content, making sure it doesn’t get hidden behind your phone’s notch or bottom bar. The code’s pretty simple:
   SafeArea(
     child: // Your main content goes here
   )
- Line ’em up with Column
Column is all about getting your widgets to stand in a nice, orderly line from top to bottom. Here’s how you write it:
   Column(
     children: [
       // Stack your widgets here, they'll line up nicely
     ],
   )
- Add a snazzy header
Let’s put a eye-catching title at the top of our Column, so users know what they’re looking at. Check out this code:
   Padding(
     padding: EdgeInsets.all(16.0),
     child: Text(
       'Check it out: ListView in a Column!',
       style: TextStyle(fontSize: 18, fontWeight: FontWeight.bold),
     ),
   )
- Enter ListView, stage center
This is the star of our show! We’ll use ListView.builder to create a scrollable list. Don’t forget to wrap it in an Expanded widget, or it might throw a fit. Here’s the code:
   Expanded(
     child: ListView.builder(
       itemCount: 20,
       itemBuilder: (context, index) {
         // Return what each list item should look like
       },
     ),
   )
- Dress up those ListTiles
Each item in our list is a ListTile. Let’s make them look good! Try this code:
   ListTile(
     leading: CircleAvatar(
       child: Text('${index + 1}'),
     ),
     title: Text('Item ${index + 1}'),
     subtitle: Text('This is super cool item number ${index + 1}'),
   )
- Add a friendly footer
After all that scrolling, let’s add a little message at the bottom to let users know they’ve reached the end. Here’s how:
   Padding(
     padding: EdgeInsets.all(16.0),
     child: Text(
       'You've reached the end. Congrats!',
       style: TextStyle(fontSize: 16, fontStyle: FontStyle.italic),
     ),
   )
- Spice up that AppBar
Finally, let’s add some pizzazz to our AppBar to make it more functional and good-looking. Check this out:
   AppBar(
     title: const Text("ListView in Column Demo"),
     leading: IconButton(
       icon: const Icon(Icons.menu),
       onPressed: () {},
     ),
     actions: <Widget>[
       IconButton(
         icon: const Icon(Icons.comment),
         onPressed: () {},
       ),
       IconButton(
         icon: const Icon(Icons.settings),
         onPressed: () {},
       ),
     ],
     elevation: 1,
   )
Pro Tips:
- Wrapping your ListView in an Expanded widget is super important. Otherwise, your list might turn into a diva and push everything else off the screen.
- ListView.builder is pretty smart – it only creates the items you can see, so you don’t have to worry about super long lists.
- SafeArea is like insurance for your content, making sure it looks good on all those weird and wonderful phone shapes out there.
Follow these steps, and you’ll end up with a slick UI that’s got both scrollable content and fixed elements all on one screen. This trick is super versatile – you can use it for chat apps, search result pages, settings screens, you name it!
FULL CODE:
import 'package:flutter/material.dart';

class NormalPage extends StatefulWidget {
  const NormalPage({Key? key}) : super(key: key);

  @override
  State<NormalPage> createState() => _NormalPageState();
}

class _NormalPageState extends State<NormalPage> {
  @override
  Widget build(BuildContext context) {
    return Scaffold(
      appBar: AppBar(
        title: const Text("ListView in Column Demo"),
        leading: IconButton(
          icon: const Icon(Icons.menu),
          onPressed: () {},
        ),
        actions: <Widget>[
          IconButton(
            icon: const Icon(Icons.comment),
            onPressed: () {},
          ), //IconButton
          IconButton(
            icon: const Icon(Icons.settings),
            onPressed: () {},
          ), //IconButton
        ],
        elevation: 1,
      ),
      body: Material(
        child: SafeArea(
          child: Column(
            children: [
              const Padding(
                padding: EdgeInsets.all(16.0),
                child: Text(
                  'This is a ListView inside a Column',
                  style: TextStyle(fontSize: 18, fontWeight: FontWeight.bold),
                ),
              ),
              Expanded(
                child: ListView.builder(
                  itemCount: 20,
                  itemBuilder: (context, index) {
                    return ListTile(
                      leading: CircleAvatar(
                        child: Text('${index + 1}'),
                      ),
                      title: Text('Item ${index + 1}'),
                      subtitle: Text('This is item number ${index + 1}'),
                    );
                  },
                ),
              ),
              const Padding(
                padding: EdgeInsets.all(16.0),
                child: Text(
                  'End of ListView',
                  style: TextStyle(fontSize: 16, fontStyle: FontStyle.italic),
                ),
              ),
            ],
          ),
        ),
      ),
    );
  }
}